This article will cover the step of the OJS 3 upgrade from your current version to the latest version. In each OJS release, there are always improvements from the previous version, the most important aspect for considering upgrading your OJS not just the feature but the security since it can threaten the existence of your OJS. In many cases, the obsolete OJS version can lead to illegal hack activity and it is not rare that the file of the article becomes corrupted or erased by the hacker.


See detailed OJS versions and download those released by PKP here.
The majority of the user of OJS 3 is using version 3 which is not the latest version, as OJS administrator we need to update the OJS once we know that the new version is available. By using the latest version of OJS, our site would become faster, secure, and can utilize many of the new features.
You can download the new version here. We recommend using the latest version of the OJS. The latest version has fixed some of the bugs and security holes from the previous version. Please download the OJS only from the official link from PKP.
By using the latest version, you also get the benefit of the new features that are provided by the OJS team. If you are curious about bugfix and the new features, you can check the list here.
This article will explain the required step for the OJS upgrade from OJS version 3 to the latest version of OJS 3.
This will cover upgrading the OJS using the web-based method, If you need a command-line version to upgrade your OJS, read this article here.
Important :
Note that doing OJS upgrades should be done by professional and experienced staff. There may be many errors that you will encounter during the upgrade. We don’t take any responsibility for any result of the OJS upgrade explained in this article.
- Before initiating the upgrade process please backup your OJS sites and database to the external drive.
- Although we have shared the detailed step to doing the OJS upgrade in this article, we don’t provide any guarantee or responsibility for the result of the OJS upgrade that is caused by this article
- OJS upgrade should be done by a professional and experienced since failed upgrade can make your OJS and its database corrupted
Preliminary note #
This article only covers the technical things of the upgrade process. You as journal manager or the team of the journal should also consider some the non-technical things such as :
- Schedule the right time to initiate the upgrade process as it may take 2 to 3 days.
- Create an announcement to your visitors, reviewer, editorial, and, author to the date that does not accept any OJS workflow
One of the major problems with upgrading the OJS is caused by the standard database collation which is from the 3.0 version is using latin_swedish and in the newer version using the utf8_general_ci that may be caused some incorrect translation. If your journal does not use Criylic character, you don’t have to worry about this problem since it will not have any effect on your OJS.
On our upgrade standard by our team, one of our protocols is to make the login disabled to the OJS system to make sure that there is not any data difference between the current OJS and the upgrade OJS process database.
What things need to be considered? #
Before you decide to upgrade your OJS, you should pay attention to these points:
- If you have a custom theme/plugin, the plugin may become incompatible with the later version of the OJS.
- The upgrade by using the web-based method should be done if you have access to CPanel and the size of your OJS and its database is less than 300MB
- If the OJS size, you are highly recommended to use the command-based upgrade by following this article.
- Once again, the upgrade should be done by experience since in the process you may find some errors that required some skill in the database query and expertise in knowing OJS database relations.
- The upgrade activity is recommended to use on the staging server.
What things need to be prepared? #
Ready to begin the process? Here are the steps required to initiate the OJS upgrade. If you are upgrading OJS incrementally on each version, you should do this tutorial repeatedly.
Backup your current OJS files and Database #
The OJS Upgrade process has a high probability of failure in the process of the upgrade. So to make sure your OJS data is not corrupted, you must do a full backup of your OJS.
- OJS Files (Folder)
- Public (Folder)
- Current database backup
Set the Webserver and PHP configuration #
Before we initiate the upgrade, which may take a long time to finish and some resources on the process, you need to increase the PHP and Webserver (Apache/Nginx) timeout. Here is the step to do that.
In Cpanel : #
PHP Max Execution time Config #
1. log in to your CPanel and find the “PHP Options” button

2. Click the “Options” tab

3. Scroll down and look for max_execution_time and click on the value field.
Change the value of the max_execution_time to 1200
Note:
If you showed a warning as below when clicking the “Options”, you should ask your hosting to increase the max_execution_time parameter.

Nginx/Apache TimeOut (optional) #
Apache
To increase the Apache TimeOut configuration please refer to this article.
Nginx
If your web server uses the Nginx, Therefore you should increase the Request Time Out parameter by following this article.
Upgrading OJS 3 to the latest version #
We recommend doing a step-by-step incremental version upgrade. If you are using the OJS 3.1.X you should upgrade the OJS to 3.1.2-4 and then to 3.3 directly although in some cases you should upgrade on each version.
3.0.x -> 3.1 -> 3.1.2-4 -> 3.2.1-4 -> 3.3.0-13 – > 3.4.0.8
This article only describes the upgrade from one version to the newer version, if you need to upgrade to the latest version, you can repeat the same step as explained in this article.
If your current OJS version is below the 3 OJS version, you can use this guide.
Step to upgrade OJS 3 to the newer version #
1. Download the New OJS version package from this link:
https://pkp.sfu.ca/ojs/ojs_download/
2. Upload the downloaded file to your server name the folder OJSVersionNumber
3. Copy this file/folder from the previous OJS version (previous) to the new version (OJSVersionNumber)
- config.inc.php
- public/
4. Enter your OJS 3.1.2 folder and find the config.inc.php file. Change installed config in the config.inc.php file

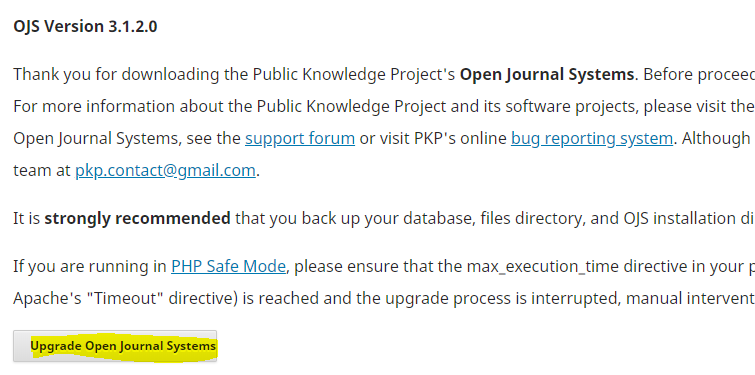
5. Access your OJS site with your browser and find the section shown in the image below then clicks the word on the yellow highlight :

Let the process run and, wait patiently The upgrade on the web time length depends on how big the database and the OJS files are.
In our experience, the upgrade process of 500MB may take 30 minutes to 1 hour. In conclusion, it takes some patience in the OJS upgrade process.
6. After the process is finished, the page will show the below image :

7. You should take attention to point 4, and change the value of installed again from Off to On

8. After you have finished you can visit the OJS upgraded version by accessing the URL of your journal and pointing to the upgraded folder.
For example https://journalDomain.com/3408/
If you find that your journal may show display with the incorrect presentation, you may need to clear your OJS cache. Please read the below link to clear your OJS cache.
How to clear cache the ojs? here
What should be done after the upgrade finishes? #
After you have upgraded the OJS, you should make sure that everything goes well without any problems such as the upload feature, submission, galley download feature any other essential workflow of OJS. Here is the standard activity checklist that our team must do after receiving the “upgrade is successful” message :
- Submission simulation
- Review and publish simulation
- Uploading a file or image in both OJS workflow and some custom editor
- Testing the email sending
- Check for the DOI
- Check the right Cyrillic character such as Ф, А́, З́, and other Cyrillic characters that may be used in the articles but are translated incorrectly.
- Download any article publication galley such as its PDF (if the file download failed, it indicates that the process failed)
- Checking and browsing the menu in the OJS to make sure that no menu result displays an infinite loading
- Checking the parameter of the config from the newer version of OJS since the newer version may introduce some new parameters that will add a new config parameter to the newer version
Don’t get tricked by the successful message on the OJS upgrade result. Based on our experience those activities should be a mandatory checklist that should be done to make sure that it is 100% sure that the upgrade is successful.
Time to clean up! #
After you are 100% convinced that the upgrade is done without any issue emerging, you should do some clean up on your server such as :
- Removing the previous OJS file and its databases
- Removing unnecessary files on the newer version folder of OJS
- Place the result of the OJS upgrade folder from OJSVersionNumber to your public_html root folder.
- Don’t forget to locate the files folder that refers to the OJS config file in the upper of your public_html file in terms of security.
Key Points: #
- You should be taken super careful on upgrading your OJS. The backup of your OJS and its file is strongly recommended
- If your OJS is left behind by the latest version of OJS, you should do the upgrade step by step from one version to the upper version
- We recommend running the upgrade in the staging server. Therefore, it won’t disturb the current live version
- Doing an upgrade by skipping from one version to the other one may make the upgrade become failed.
- The phase of upgrade should be 3.0.x -> 3.1 -> 3.1.2-4 -> 3.2.1-4 -> 3.3.0-13 -> 3.4.0.8
- If you need a more professional OJS upgrade from our team, you can click this link OJS Upgrade Service. We have helped many publishers in upgrading their OJS in hundred of journals with a 100% successful rate including the guarantee of the upgrade result


